Eddie's Portable Chain Saw Mill -
Page two - 1999
Back to page one - 1998.
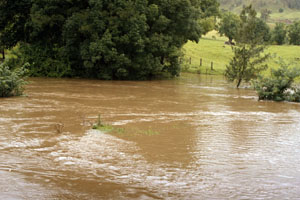
It is now mid March 1999, last year I made my first chainsaw mill. This year I made version-2 and with it comes a story of an angry creek, a MIG welder, a fallen river-oak (Casuarina) and my battle to save it from decay and the creek.
 On
xmas-eve I woke to the sounds of water rushing near the room where
I stay when at Nimbin Rocks. This is what the entrance to our
co-op property looked like. The creek which is sometimes little
more than ankle deep had broken it's banks and was about 2 meters
over the bridge (which would normally be visible in the centre of
this photo). This was the first time I'd seen the bridge flooded
but it has been a regular occurrence since then.
On
xmas-eve I woke to the sounds of water rushing near the room where
I stay when at Nimbin Rocks. This is what the entrance to our
co-op property looked like. The creek which is sometimes little
more than ankle deep had broken it's banks and was about 2 meters
over the bridge (which would normally be visible in the centre of
this photo). This was the first time I'd seen the bridge flooded
but it has been a regular occurrence since then.
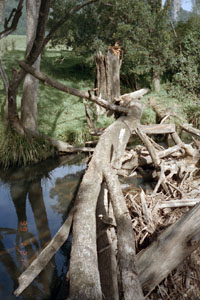 After
the flood I set my sights on this river-oak. I had looked at
it before when it was this sitting on it's stump and laying over
the creek. The idea of harvesting the wood while it was 3 meters
off the ground and supported at each end was rather daunting. I
wasn't sure if the wood was still sound. The flood had dislodged
the log from the stump and it seemed a little more practical to
retrieve it. I chipped the bark off in places and the wood seemed
in fair condition. The log had caused a log-jam which is a bad
thing because it's likely to increase erosion as flood waters are
diverted around it - so everyone was happy for me to remove it -
if I could!
After
the flood I set my sights on this river-oak. I had looked at
it before when it was this sitting on it's stump and laying over
the creek. The idea of harvesting the wood while it was 3 meters
off the ground and supported at each end was rather daunting. I
wasn't sure if the wood was still sound. The flood had dislodged
the log from the stump and it seemed a little more practical to
retrieve it. I chipped the bark off in places and the wood seemed
in fair condition. The log had caused a log-jam which is a bad
thing because it's likely to increase erosion as flood waters are
diverted around it - so everyone was happy for me to remove it -
if I could!
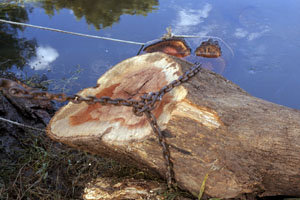
I hunted for a suitable winch to pull it out, my
uneducated guess was the log was in the order of five to ten
tonnes and hoped a 5 tonne winch could pull it free and onto the
bank. It turned out I actually owned a three ton chain winch
which a previous occupant had left at my house. It came with extra
pullies and stuff to increase the pull to six tons or more. The
winch is very heavy and moving it was no fun. I lashed the winch
to a nearby tree with the hope of pulling the log several meters
up the bank - I'd mill a meter or so then winching it some more -
but this wasn't to be.
After attaching the chains etc I
carefully cut as many of the branches as I could without taking to
many risks. Next day I added a smaller winch to roll the log into
a better position. The jagged end of the log was snagging on
debris and it took many hours to move the log 100mm - then my
chain broke - the log rolled and I couldn't budge it again.
That
night the creek flooded again, two meters of water went over
everything. The log was still held by the chain but had swung with
the current. The log jam had cleared, the log was just floating
next day but I still couldn't move it up the bank. I hoped the
water wouldn't hurt the wood to much and that the log might be in
a better position to cut it up once the water went down. I would
have preferred to have the log intact but this didn't seem
possible without some serious equipment (a crane?). I went
back to Brisbane for a few weeks.
 On
returning to Nimbin the creek was much lower. The log was mostly
submerged in chest deep water, the bottom was stony. My only real
option with the equipment I had was to cut the log while it was
below the surface of the water. I spent a long time trying to
figure out the forces on the log so it did not roll on me, roll
out from under me or jam the saw. I'm still here so I must have
got it right. Two long but fairly narrow pieces were cut with the
log in it's natural resting place. It's a bit weird watching the
pieces silently sink away. These were winched onto the bank and
towed out with my car. The other two cuts were more difficult - I
had to winch the log to the surface while being careful not to
apply forces that would jam the saw bar. Holding the heavy saw
with its long bar out of the water while cutting below the surface
was a bit of a strain. It was hard to gauge progress and often it
seemed like it wasn't cutting at all. Eventually the remaining
trunk was cut in to three pieces. The wood was water-logged (as
you'd expect a log in water to be) and didn't float. It was still
buoyant enough to be lifted by me. That's another wierd feeling -
picking up a few tonnes of log and wrestling it into place. Once I
had them in postion it was a 20 minute job for our friendly farmer
to pull them out with our 4WD tractor. We towed them 20 meters
onto the grass but that isn't the end of the story.....
On
returning to Nimbin the creek was much lower. The log was mostly
submerged in chest deep water, the bottom was stony. My only real
option with the equipment I had was to cut the log while it was
below the surface of the water. I spent a long time trying to
figure out the forces on the log so it did not roll on me, roll
out from under me or jam the saw. I'm still here so I must have
got it right. Two long but fairly narrow pieces were cut with the
log in it's natural resting place. It's a bit weird watching the
pieces silently sink away. These were winched onto the bank and
towed out with my car. The other two cuts were more difficult - I
had to winch the log to the surface while being careful not to
apply forces that would jam the saw bar. Holding the heavy saw
with its long bar out of the water while cutting below the surface
was a bit of a strain. It was hard to gauge progress and often it
seemed like it wasn't cutting at all. Eventually the remaining
trunk was cut in to three pieces. The wood was water-logged (as
you'd expect a log in water to be) and didn't float. It was still
buoyant enough to be lifted by me. That's another wierd feeling -
picking up a few tonnes of log and wrestling it into place. Once I
had them in postion it was a 20 minute job for our friendly farmer
to pull them out with our 4WD tractor. We towed them 20 meters
onto the grass but that isn't the end of the story.....
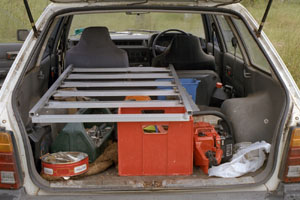 The
ladder mill I'd made last year served me well but I wanted a
range of rails of differing lengths and widths. I also wanted
rails I could cascade for longer lengths and I want to use my
ladder as a two piece ladder again. I decided against trying to
make the pieces of the two designs interchangeable so now I could
choose any extrusion I wanted. I fancied using 25mm round aluminum
tubing for the rails and rectangular section for the cross pieces.
Round tubing was harder to obtain than square so I changed to
using anodized, 3mm walled, 25mm square tube for the rails and
3*50*25mm for cross peices. I initially intended to weld the rails
at 45 degrees to the cross pieces, that is - weld one corner so
it's a diamond view end on. In the end I took the easier option of
keeping the rails with the top and bottom sides parallel to the
cross pieces. The cross pieces only extend about haf the width of
the rail so the saw carriage can wrap around under the rail and
prevent it lifting off. I MIG welded the rail assembly - MIG
welding has a page of its own.
The
ladder mill I'd made last year served me well but I wanted a
range of rails of differing lengths and widths. I also wanted
rails I could cascade for longer lengths and I want to use my
ladder as a two piece ladder again. I decided against trying to
make the pieces of the two designs interchangeable so now I could
choose any extrusion I wanted. I fancied using 25mm round aluminum
tubing for the rails and rectangular section for the cross pieces.
Round tubing was harder to obtain than square so I changed to
using anodized, 3mm walled, 25mm square tube for the rails and
3*50*25mm for cross peices. I initially intended to weld the rails
at 45 degrees to the cross pieces, that is - weld one corner so
it's a diamond view end on. In the end I took the easier option of
keeping the rails with the top and bottom sides parallel to the
cross pieces. The cross pieces only extend about haf the width of
the rail so the saw carriage can wrap around under the rail and
prevent it lifting off. I MIG welded the rail assembly - MIG
welding has a page of its own.
 The
carriage is similar to version one with the main difference being
that the extrusion the saw attaches to is set at 5 degrees. The
saw saw still attaches with one bolt at each end of the bar. The
each bolt goes through the middle of a spacer which set the slab
thickness, not two bolts per end as previously. Version one had
the extrusion set square and the bar bolted to diagonal holes at
each end. The new system is much easier to use, it also easier to
make the spacers. I'm not sure there is any need to set the saw at
an angle at all - I stayed with what I knew worked. Once
again the slides were epoxy/kevlar and the rest epoxy/glass,
aluminium and PVC foam.
The
carriage is similar to version one with the main difference being
that the extrusion the saw attaches to is set at 5 degrees. The
saw saw still attaches with one bolt at each end of the bar. The
each bolt goes through the middle of a spacer which set the slab
thickness, not two bolts per end as previously. Version one had
the extrusion set square and the bar bolted to diagonal holes at
each end. The new system is much easier to use, it also easier to
make the spacers. I'm not sure there is any need to set the saw at
an angle at all - I stayed with what I knew worked. Once
again the slides were epoxy/kevlar and the rest epoxy/glass,
aluminium and PVC foam.
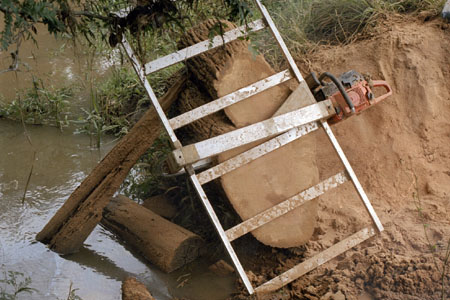
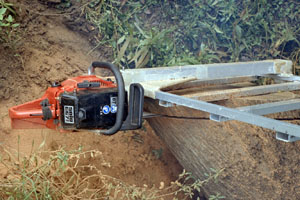
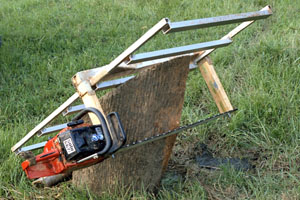
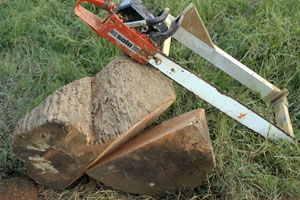
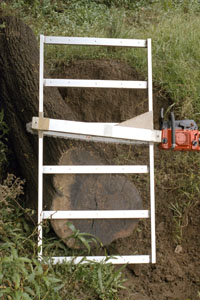 On
returning to Nimbin with my new rig I found the logs were not
where I'd left them. While I'd been away Nimbin had the biggest
flood in 8 years. One piece was back in the creek on a mud flat.
One piece was still on the grass and the largest piece was in an
erosion gully with the end flush with the creek bank (see right
photo and top photo). I milled this piece into 70mm slabs where it
lay but had to move a small amount of soil to do so. I had some
problems which were chain problems but the mill worked well. I
only cut around 6 slabs a day because after that the chain was
blunt and I'd had enough and there were other things I wanted to
do. On the last day of milling this log the flood waters start to
rise again. I took advantage of this to tow the piece on the mud
flat into a better position. The photo at the top of the page
shows the second last 70mm slab being cut as the water was rising.
After the last 70mm slab was cut I towed the rest to higher
ground.
On
returning to Nimbin with my new rig I found the logs were not
where I'd left them. While I'd been away Nimbin had the biggest
flood in 8 years. One piece was back in the creek on a mud flat.
One piece was still on the grass and the largest piece was in an
erosion gully with the end flush with the creek bank (see right
photo and top photo). I milled this piece into 70mm slabs where it
lay but had to move a small amount of soil to do so. I had some
problems which were chain problems but the mill worked well. I
only cut around 6 slabs a day because after that the chain was
blunt and I'd had enough and there were other things I wanted to
do. On the last day of milling this log the flood waters start to
rise again. I took advantage of this to tow the piece on the mud
flat into a better position. The photo at the top of the page
shows the second last 70mm slab being cut as the water was rising.
After the last 70mm slab was cut I towed the rest to higher
ground.
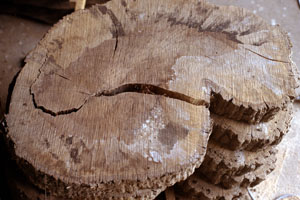
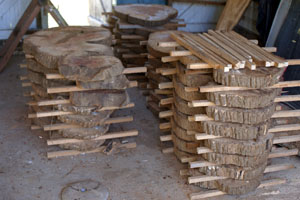 This
is most of the wood I cut during the week. It will crack as it
dries and require filling. The aim is to make coffee tables for
sale. River-oak is much more difficult to work with than camphor
but I hope its character will appeal to people as it does to me.
The exercise (in more than one sense of the word) is a gamble -
I'll have to wait for the wood to dry and see what condition it's
in and look for a market.
This
is most of the wood I cut during the week. It will crack as it
dries and require filling. The aim is to make coffee tables for
sale. River-oak is much more difficult to work with than camphor
but I hope its character will appeal to people as it does to me.
The exercise (in more than one sense of the word) is a gamble -
I'll have to wait for the wood to dry and see what condition it's
in and look for a market.
 I
fancied cutting a 300mm slab out of the remainder of the stump. My
mill was never intended for cutting anything that thick. I was
happy it could do 70mm which is the thickness the bulk of my slabs
are cut to - 70mm was the thickest I'd ever cut. I wasn't
optimistic I could do much thicker but thought it was worth a try.
The Charter's hardware store in Nimbin had the bits I needed to
jerry rid some 300mm spacers and I was set to go. I was much more
careful cutting this 100 Kg plus slab that the "thin"
ones but it went without a hitch.
I
fancied cutting a 300mm slab out of the remainder of the stump. My
mill was never intended for cutting anything that thick. I was
happy it could do 70mm which is the thickness the bulk of my slabs
are cut to - 70mm was the thickest I'd ever cut. I wasn't
optimistic I could do much thicker but thought it was worth a try.
The Charter's hardware store in Nimbin had the bits I needed to
jerry rid some 300mm spacers and I was set to go. I was much more
careful cutting this 100 Kg plus slab that the "thin"
ones but it went without a hitch.
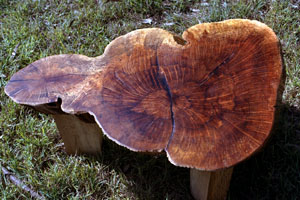
 This
piece is now being used as a bed side table - I may have to wait
years for it the dry enough to sand and finish. I'm not likely to
knock this one over by accident!
This
piece is now being used as a bed side table - I may have to wait
years for it the dry enough to sand and finish. I'm not likely to
knock this one over by accident!
June-1999,
As expected the slabs cracked and opened up. Filling and sanding them has been very labor intensive. I'd estimate 2 to 3 times the work goes into making a River-oak coffee table compared to a Camphor one. I'm not optimistic the money I make from them will justify the many hours that have gone it them - but fingers crossed anyway. Below is a table I made for myself and I'm quite fond of it. Being one of the early ones the wood continued to crack and I had to repair it. My last batch of tables was made from slabs that had dried longer and they seem to be fairly stable. If they crack more then I've got plenty of firewood to see me thru the winter :(

The response to my first batch of tables has been very positive so it could all pay off. There are another 3 logs which I have to decide whether to mill or not. If I go ahead I could get at least 100 table tops from them and probably more like 200.
On the Camphor front.
Last month I
started felling a large Camphor. Because of the uncertainty with
the river-oak, I want to get some camphor cut and drying. The tree
trunk is almost a meter across. I need an even larger saw! This
was my first attempt at this sort of thing. And it's a dangerous
game indeed. The trouble was when I lopped the last major branch.
This branch was maybe 400mm thick and 2.5 meters off the ground.
It was more horizontal that vertical. It broke from the tree as
intended but a branch on the branch (whatever that's called)
speared into the ground and acted as a pivot. The tip of the main
branch fell into a gully causing the base which I'd cut to rise
higher than it's orginal height by say 500mm and COME BACK about a
meter. This bit I don't understand. The branch, all one or two
tonnes of it, scrapped down the side of the tree - fortunately on
the other side to where I was. Had it come down my side I'm not
sure I could have gotten away. I lost some sleep that night. I
don't want to take a risk like that again. I've taken 9 slabs so
far, 5 from the top of the 3 meter high stump - that's what I call
a portable mill! These are cross-cut - so the surface of the slab
is end-grain. I'm not sure how well this will look so I'm
undecided whether to continue this way of fell the stump and rip
it. I'm still learning.
 Now
this is what you don't want. This is one of the pieces from the
stack after nine months of drying. This was the most exposed of
the slabs.
Now
this is what you don't want. This is one of the pieces from the
stack after nine months of drying. This was the most exposed of
the slabs.
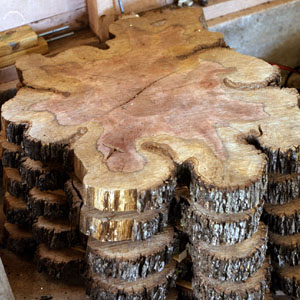 This
is a stack I made in October 1999. It's been nicknamed the amoebae
tree for obvious reasons. You can see a large crack across the
middle of the top piece when it was freshly cut. This tree had
been standing dead for about 5 years. In order to attempt to
reduce the cracking I wrapped the 15 high stack in builders
plastic for the first month and partly wrapped in in hessian (I
ran out) after that. Due to work deadlines I'm unlikely to be
doing any more milling till next April or so.
This
is a stack I made in October 1999. It's been nicknamed the amoebae
tree for obvious reasons. You can see a large crack across the
middle of the top piece when it was freshly cut. This tree had
been standing dead for about 5 years. In order to attempt to
reduce the cracking I wrapped the 15 high stack in builders
plastic for the first month and partly wrapped in in hessian (I
ran out) after that. Due to work deadlines I'm unlikely to be
doing any more milling till next April or so.
Back
to page one.