Eddie's
Portable Chain Saw Mill - the Ladder Mill.
1998 vintage.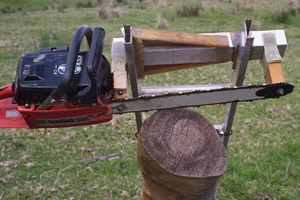
A
home made el-cheapo mill.
Click here some scans of some timber I cut.
This is an old page,
I haven't
milled anything for years but it is still the most popular page on
my site. I've killed the links which were mostly dead. Maybe next
year I'll have more time and I'll show you my slab surfacing rig
and I'll get around to finish my dinning table.
Why I
made it.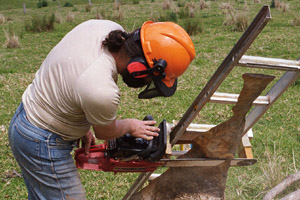 Driving
around the country side in my part of the globe (Eastern
Australia), one sees much timber laying around in the form of dead
logs. For 20 years I've looked at it and thought it'd be good to
be able to mill it on site using some sort of portable chainsaw
mill. It wasn't until I joined the Nimbin
Rocks Co-operative that I became serious about the idea. At
Nimbin we have not only fallen timber but a large number of
Camphor Laurel trees which will be cleared over time. The Camphor
Laurel is considered a noxious pest in Northern NSW, it is an
introduced tree which is very invasive and has taken over large
areas of once native habitat, particularly creeks beds. Killing
these trees is likely to be a legal requirement for the
landholders (us) in the near future. The camphor
wood is also a prized timber for wood turning and furniture
making - it'd be a shame to see it rot.
Driving
around the country side in my part of the globe (Eastern
Australia), one sees much timber laying around in the form of dead
logs. For 20 years I've looked at it and thought it'd be good to
be able to mill it on site using some sort of portable chainsaw
mill. It wasn't until I joined the Nimbin
Rocks Co-operative that I became serious about the idea. At
Nimbin we have not only fallen timber but a large number of
Camphor Laurel trees which will be cleared over time. The Camphor
Laurel is considered a noxious pest in Northern NSW, it is an
introduced tree which is very invasive and has taken over large
areas of once native habitat, particularly creeks beds. Killing
these trees is likely to be a legal requirement for the
landholders (us) in the near future. The camphor
wood is also a prized timber for wood turning and furniture
making - it'd be a shame to see it rot.
 Some
of the advantages of a cheap portable sawmill are pretty obvious.
We don't have to move heavy logs around and can mill timber that
could not economically be taken to a mill. We can mill small logs
that wouldn't be worth milling by other methods and we can save
lots of money - possibly a factor-four
improvement.
Some
of the advantages of a cheap portable sawmill are pretty obvious.
We don't have to move heavy logs around and can mill timber that
could not economically be taken to a mill. We can mill small logs
that wouldn't be worth milling by other methods and we can save
lots of money - possibly a factor-four
improvement.
Some of the advantages are less obvious.
Access to woods you just don't see coming out of a normal mill.
Control over the seasoning of the timber so it doesn't warp after it's cut, straight timber can be hard to buy.
The ability to use existing features that a normally trimmed off or rejected in commercial timber.
 Modern
humans seem intent on straightening and leveling what ever shapes
nature gives them. You can't go to a regular hardware or timber
place and say "I'll take that milled tree fork over there, 4
of those half logs, a dozen pieces of sapwood, that boomerang
shaped piece of mango tree and that slab of gum with the
interesting burnt out bit in the middle". Instead it's all
rectangles of various standard dimensions in a small range of
species. I think furniture and buildings incorporating the curves,
textures and what are normally called detects would add a lot of
soul to the places with live/work in. Perhaps this is another "A
pattern language" type pattern.
Modern
humans seem intent on straightening and leveling what ever shapes
nature gives them. You can't go to a regular hardware or timber
place and say "I'll take that milled tree fork over there, 4
of those half logs, a dozen pieces of sapwood, that boomerang
shaped piece of mango tree and that slab of gum with the
interesting burnt out bit in the middle". Instead it's all
rectangles of various standard dimensions in a small range of
species. I think furniture and buildings incorporating the curves,
textures and what are normally called detects would add a lot of
soul to the places with live/work in. Perhaps this is another "A
pattern language" type pattern.
What systems exist already?
The chainsaw
mill is not the only type of portable sawmill. I've seen an
excellent rotary saw based system which will produce a superior
cut - but it's out of my league price wise and not as portable as
my system. There are also systems which use a chainsaw engine to
drive a bandsaw - of example "the wood mizer” nice but
again not likely to be in my price range. The chainsaw has the
advantage of being relatively cheap, widely available and well
supported when it needs service (eg, sharpening). On the down side
it produces a fairly rough cut and turns about 7 mm (>1/4 in)
of timber into sawdust. I know of several chainsaw based
systems... One is the Canadian "Beam Machine" - a cheap
(US$40?) attachment to guide the saw along a 2 by 4 inch piece of
timber which is nailed to the log as a guide - crude but cheap.
Another is a local (Beerwah-Qld) product call the "Ripper",
I think the current model is mark IV. The ripper is a nice unit
which works by running a bearing assembly along a steel bar, this
is attached to the motor end of the chainsaw bar - the price is
AU$900. Both systems are intended to be used with the saw bar
vertical - so the log needs to be raise off the ground to allow
the saw to cut through without hitting the ground. The ripper type
system has advantages over mine for certain types of work such as
parting (splitting) logs, cutting very thick slabs/beams and doing
diagonal cuts. I'd expect the ladder-mill to be more accurate and
easier to use for small logs and certain shapes of logs will suit
one system more than the other. I'm thinking of modifying my setup
to be able to do cuts at 90 deg to the ladder so I'd get the
advantages of the ripper style setup as well - the main problem I
see with this modification is that if the log was to fall over (It
shouldn't) the mill could be seriously damaged (so could I). See
my links for other mills.
How I made it..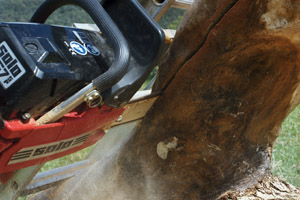 I
bought myself a 69 cc Solo chainsaw which came with a 24 inch bar
(I think) -this cost me $700 tax free, I also bought a 36 inch
titanium bar for $138 and a chain for $40. In case you don't know
- the stationary bit the chain runs around is called a "bar".
To guide my saw I used an aluminum ladder I already owned. The saw
bar is bolted at both ends and the saw in intended to be
horizontal. I made sliders from epoxy-kevlar and epoxy-glass (ie
fibre-glass) held the creation together. The saw bar is bolted to
a piece of aluminum extrusion with wooden spacers. All these
things I already had - so the only things I had to buy were the
bolts and a drill. Apart from some problems due to the warps in
the ladder (it was a used ladder) everything went smoothly until I
tried to drill a hole in the tip of the chainsaw. I got a small
hole through one plate (the tip has a bearing with a plate on
either side) but couldn't dent the second side. I took the bar to
a friend's workshop and he put it in his milling machine and tried
every tool he had without any luck. I gave up and went to Nimbin
without it but brought some camphor logs home to experiment on. To
use the mill you screw the ladder onto the top of a fallen log and
run the saw along under the ladder.
I
bought myself a 69 cc Solo chainsaw which came with a 24 inch bar
(I think) -this cost me $700 tax free, I also bought a 36 inch
titanium bar for $138 and a chain for $40. In case you don't know
- the stationary bit the chain runs around is called a "bar".
To guide my saw I used an aluminum ladder I already owned. The saw
bar is bolted at both ends and the saw in intended to be
horizontal. I made sliders from epoxy-kevlar and epoxy-glass (ie
fibre-glass) held the creation together. The saw bar is bolted to
a piece of aluminum extrusion with wooden spacers. All these
things I already had - so the only things I had to buy were the
bolts and a drill. Apart from some problems due to the warps in
the ladder (it was a used ladder) everything went smoothly until I
tried to drill a hole in the tip of the chainsaw. I got a small
hole through one plate (the tip has a bearing with a plate on
either side) but couldn't dent the second side. I took the bar to
a friend's workshop and he put it in his milling machine and tried
every tool he had without any luck. I gave up and went to Nimbin
without it but brought some camphor logs home to experiment on. To
use the mill you screw the ladder onto the top of a fallen log and
run the saw along under the ladder.
Progress diary.
25-June-98 - first run.
I managed
to drill through using a 3mm tungsten drill that's intended for
tiles. I enlarged the hole with a 5mm and then 8mm tile drills
(the latter I wrecked) and then used a grinding wheel to enlarge
to 3/8 inch to suit my bolts. I bolted the saw in place so that it
was at a slight angle (say 5 degrees) from perpendicular - such
that the motor end of the bar will be ahead of the bar tip when
cutting. Since this was a "let's see if this thing works"
type of experiment - I didn't go to too much trouble to attach the
ladder to the log - just 3 plaster board type screws (call them
wood screws if you want). I attached the saw and cut a layer off
the log by pushing the saw along while I was on my knees - it
works! I took a second slab in a similar manner. All things
considered it looks very promising. The Mill didn't shake itself
apart as I'd feared it would. The log I cut is fairly small-
around 150 mm across and I've only rigged up my small bar so far.
The slabs I cut are around 25mm thick, I'll try wider thicker
slabs in the next few days.
27-june-98 -thicker slab.
Yesterday
I glued some 10mm thick scrap aluminum to some of the ladder's
treads so they are now flush with the extrusions. I bought some
treaded rod and made some longer bolts so I could cut a thicker
slab. I cut some slabs at around 60mm thick. The whole thing is a
bit jerry rigged at this stage and the saw did wobble around a
bit, it still produced a fairly good cut - for a chain that is. I
sanded a sample with a flap wheel in my angle grinder, I was
impressed with how fast the flap wheel could remove the saw marks.
It wasn't exactly french polished but quite good for a few minutes
work.
3-July-98 - My stuff up.
The
small bar I've been using has a chain sprocket at the tip. I
drilled through the centre of this bearing for the setup described
above. The long titanium bar does not have sprocket at the tip.
After looking at it a long time I figured the tip had a disk
of hard metal sandwiched between 2 sheets of titanium -wrong! I
tried to drill through it near the edge of the "disk"
and found that it's a roller bearing assembly. Even though there
are no teeth the ring does rotate when the chain is tensioned
around it - it did not rotate when I tried to move it with a
screwdriver tip! Apparently the lack of a sprocket is safety
feature in case of a bearing failure. The damaged bearing assembly
does still seem to be working but I don't know how long for or how
long the chain would last once the bearing fails.
24-july-98 - Right angle
adapter. Two
weeks ago I made an adapter so I can run the saw at 90 deg to
normal. I made it out of epoxy-glass with 3/8 inch nuts embedded.
Today I tried it out. I only had a small log and no blocks or
jigs to set the log up properly. I improvised by hanging the log
from the ladder with screws and a strap and raising one end with a
saw horse and the other with some wooden blocks. The saw wobbled
around a bit but seeing I was pulling it along with one hand,
steadying the ladder with my knee and holding a bag of cement in
place with the other hand - it went as well as can be expected -
don't try this at home kids. Although the ladder was twisted
noticeably by the weight the cut looks quite straight. This setup
was more difficult than the normal "slabbing" mode but
will come in handy. I ended up with a twisted ladder but I was
easy to untwist it - too easy in fact, it need to be made more
rigid. I have in mind to buy some extrusion and make up my own
guides.
Two
weeks ago I made an adapter so I can run the saw at 90 deg to
normal. I made it out of epoxy-glass with 3/8 inch nuts embedded.
Today I tried it out. I only had a small log and no blocks or
jigs to set the log up properly. I improvised by hanging the log
from the ladder with screws and a strap and raising one end with a
saw horse and the other with some wooden blocks. The saw wobbled
around a bit but seeing I was pulling it along with one hand,
steadying the ladder with my knee and holding a bag of cement in
place with the other hand - it went as well as can be expected -
don't try this at home kids. Although the ladder was twisted
noticeably by the weight the cut looks quite straight. This setup
was more difficult than the normal "slabbing" mode but
will come in handy. I ended up with a twisted ladder but I was
easy to untwist it - too easy in fact, it need to be made more
rigid. I have in mind to buy some extrusion and make up my own
guides.
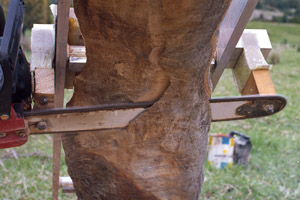
31'st August 1998
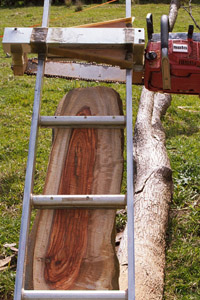 I
replaced some of the wooden spaces with fiberglass ones which are
more rigid and accurate. I'm still using some wood to set the
thickness to cut. I cut one 80mm slab at home then took the rig to
Nimbin for the weekend and cut about 10 pieces off a Camphor
branch mentioned earlier. Most of the photos of the Mill were
taken then. Some of the cuts were from a piece which was at
inclined around 45 degrees. At this angle the saw travels along
pulled by gravity and I was able to walk away and take photos of
it. Some people from the property across the creek were attracted
by the noise and came for a demo.
I
replaced some of the wooden spaces with fiberglass ones which are
more rigid and accurate. I'm still using some wood to set the
thickness to cut. I cut one 80mm slab at home then took the rig to
Nimbin for the weekend and cut about 10 pieces off a Camphor
branch mentioned earlier. Most of the photos of the Mill were
taken then. Some of the cuts were from a piece which was at
inclined around 45 degrees. At this angle the saw travels along
pulled by gravity and I was able to walk away and take photos of
it. Some people from the property across the creek were attracted
by the noise and came for a demo.
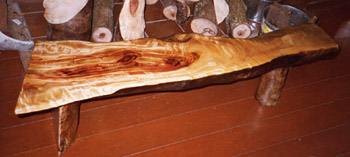 Last
weekend I sanded and estapoled one of the slabs that was cut in
one of the photos above. I stuck a
piece of slab under it at one end and a piece of branch at the
other and called it a side table.
Last
weekend I sanded and estapoled one of the slabs that was cut in
one of the photos above. I stuck a
piece of slab under it at one end and a piece of branch at the
other and called it a side table.
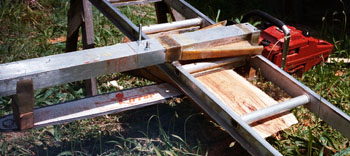
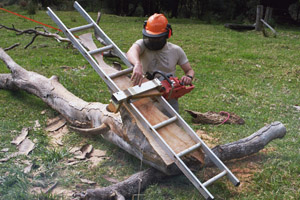
Today
I finished extending the rig to take my long bar. I didn't have
any wide bit of wood to cut so I settled for cutting a small
piece. Note that here the wood is hanging under the ladder and off
the ground. This can be easier for light pieces. The rig is easier
to balance with the long bar fitted because it counter balances
the heavy motor. I made a carbon and glass fibre insert to extend
the extrusion. This is glued into the extension piece and bolted
to the existing piece. There was a slight bow in the bar probably
because the holes through the wood aren't quite right.
The samples that were here have moved to the Samples page.