Eddie's El-Cheapo CIS (Continuous
Inking System) Part-2
Intellidge
ink chip hack
Epson Stylus 1160 version.
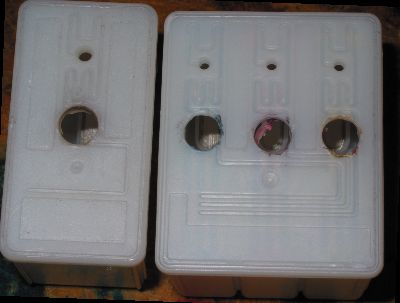 After
playing with some old cartridges I bought some new set of Calidad
"Hero" cartridges. The ink is useless to me and I wanted
the seals to be in perfect condition so I did not use the ink.
Used ones are probably OK but I didn't want to risk it. I managed
to remove all the ink filled foam thru holes aprox 8mm across. The
black one was very difficult because it is larger. After removing
the foam I pierced the plastic over the ink ports and wash the
remaining ink out with tap water because I didn't want it to dry
on the metal filter which covers the inside of the ports (just
visible in the photo). If I did it again I think I'd put the hole
somewhere else where I don't need to insert a tube. I tried
plugging the hole with epoxy putty and then drilling thru it. I
ended up with lumps of putty inside that were hell to remove –
a sharp drill might have helped. Second attempt I put putty around
a tube poked it in the hole and removed tube leaving a hole in the
putty – this worked.
After
playing with some old cartridges I bought some new set of Calidad
"Hero" cartridges. The ink is useless to me and I wanted
the seals to be in perfect condition so I did not use the ink.
Used ones are probably OK but I didn't want to risk it. I managed
to remove all the ink filled foam thru holes aprox 8mm across. The
black one was very difficult because it is larger. After removing
the foam I pierced the plastic over the ink ports and wash the
remaining ink out with tap water because I didn't want it to dry
on the metal filter which covers the inside of the ports (just
visible in the photo). If I did it again I think I'd put the hole
somewhere else where I don't need to insert a tube. I tried
plugging the hole with epoxy putty and then drilling thru it. I
ended up with lumps of putty inside that were hell to remove –
a sharp drill might have helped. Second attempt I put putty around
a tube poked it in the hole and removed tube leaving a hole in the
putty – this worked.
 I
got some more practice in with my glass bending and made a bunch
of right angle elbows. Half were short for the air extraction
(priming) ports and half long for the ink supply tubes. To keep an
air-tight seal on the extraction port silicone tube was attached
and springs out of clothes pegs were modified as shown here. The
tube and spring are glued in place. The hole for the feed tubes
were enlarged to suit.
I
got some more practice in with my glass bending and made a bunch
of right angle elbows. Half were short for the air extraction
(priming) ports and half long for the ink supply tubes. To keep an
air-tight seal on the extraction port silicone tube was attached
and springs out of clothes pegs were modified as shown here. The
tube and spring are glued in place. The hole for the feed tubes
were enlarged to suit.
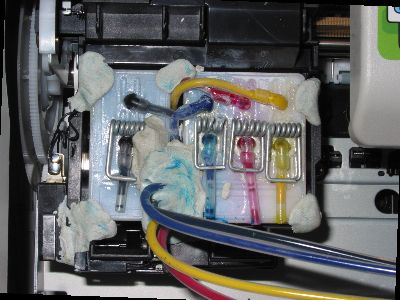 And
here it is fitted into the 1160 (last night). Priming was trivial
and after a few cleaning cycles and letting it rest for an hour I
was printing. This morning a few jets played up, it seems to take
a while for the air to works it's way out of the system after a
major change like this. Tonight it is fine working again. Another
thing to note is the micro switch in the bottom left. I cut the 3
wires which go to the cartridge sense switches and wired them to
this micro. Whenever the printer thinks it is out of ink I move
the head into the change position, push the micro and print some
more. Every time I push this I save $80 compared to buying OEM
cartridges. The switch has normally closed contacts and goes open
circuit when pushed.
And
here it is fitted into the 1160 (last night). Priming was trivial
and after a few cleaning cycles and letting it rest for an hour I
was printing. This morning a few jets played up, it seems to take
a while for the air to works it's way out of the system after a
major change like this. Tonight it is fine working again. Another
thing to note is the micro switch in the bottom left. I cut the 3
wires which go to the cartridge sense switches and wired them to
this micro. Whenever the printer thinks it is out of ink I move
the head into the change position, push the micro and print some
more. Every time I push this I save $80 compared to buying OEM
cartridges. The switch has normally closed contacts and goes open
circuit when pushed.
The cartridge modification is a lot more
work than the syringe method. If the ink you are going to use in
compatible with what's in the cartridge you might be able to leave
the foam in place and save a lot of time. If I had had generations
cartridges I might have done this but it is quite possible I will
want to change ink sets at some point.
Apart from looks (maybe)
there is little advantage of using this method instead the
syringes. The main thing is the ink is filtered.