Eddie's El-Cheapo CIS (Continuous Inking System) Part-3
Epson 2100p version.
October 2002, The concept.
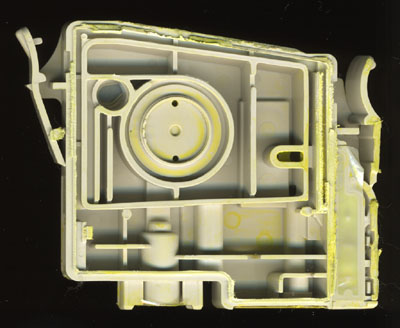
Hack
out some room, stick in a modified 5 ml syringe, bring out a ink
tube and a bent needle for priming. The nozzle has silicone tube
over it (same as the bit attaching the ink tube) to couple with
the print-head's ink spikes. The ink tube nozzle is the nozzle
from cut from another syringe. In the past I've used glass tubing
but I ran out of it.
What isn't shown here is the wiring which bring the inkchip signals out to a connector at the top.
15'th of November Taking the plunge.
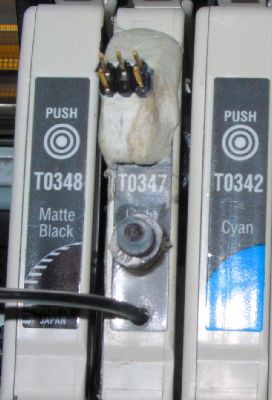
In
the paste few weeks I have been testing my homebrew light black
ink. A CIS is pretty useless if you can't get ink. I now have ink
which seems to work. Here you can see the light black CIS
cartridge. At the bottom the ink tube goes off to the left.
Slightly up in the image is the plug to block the priming port.
Near the top of the image is a connector which is wired to the 5
inkchip signals I need to reset a number of the chips (hopefully
4). The black cart will have another connector which mates up
which this one so I can use a single plug for both. A half a dozen
cleaning cycles and I had a good nozzle test using my new ink.
The
home made light black seems to work. I'm still adjusting the
mixture to give the right density and I am getting a bit of
clogging. When I stop playing with it that may improve.
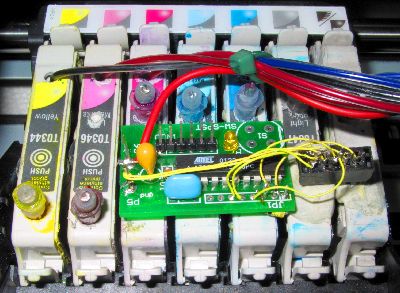
Here
is the complete system. The chip defeating micro (front) gets its
power from a flexible wire bundled with the ink lines. The power
come from the printer's parallel port. It can fool the printer
into thinking all cartridges are full. There wasn't enough
clearance to use a proper socket. A right angled connector may
have been better. There was also a clearance problem with the
vacuum ports on the black cartridges. They had to be low profile
to clear the case. Hacking out a few bits of plastic would have
made it easier, so would putting the electronics inside the
printer. Apart from removing the (useless) lid covering the
cartridges the printer is unmodified. Some flat tube sets may been
nice. It takes some tweaking to stop the tubes catching on
things.
Don't be fooled by the black tube running into the
yellow cartridge, it does have yellow ink inside it.
My circuit monitors the ink levels being read out of the chips and when it detects a chip is low it arms itself and spoofs the printer NEXT time it is turned on. It fools the printer into reading all 7 chips as full. The printer writes the new levels into the chips – usually at shutdown. A circuit diagram is here.
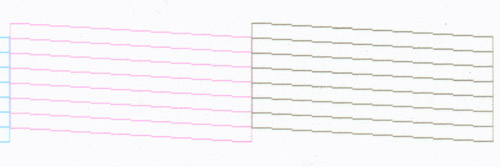
The first test prints.
I printed a test pattern
using the G4 profile I created for the 1160 (RIP and I don't mean
Raster Image Processor). For a first pass it was excellent, I will
have to spent a few hours tuning the profile but it is looking
good already. It will take a while to get the light black mixture
right. The 10% mix was too light 25% too dark.
Looking at the
nozzle tests I can see the difference in color between the G4 and
ultrachrome. The UC magenta is warmer and yellow denser, not a
huge difference thought. Perhaps surprisingly - the G4 black is
noticeably denser. Personally I think ultrachrome was hyped up, it
is a little better color wise at the expense of life expectancy. I
wouldn't say no to brighter colors but not at $2000 a kilo. G4
works just fine for me.
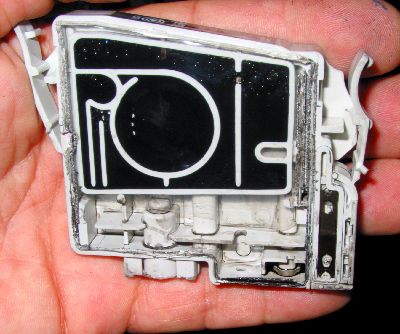
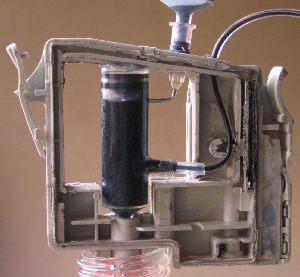
There
might be easier ways to modify the cartridges. Having ripped open
10 or so I now know it is possible to remove the cover without
breaking the membrane- as shown here. If a reliable way could be
found to block the air vents (right side in this photo) – it
would only mean inserting a tube or two at the top. Because the
carts have several valves already built in, they could be primed
before being fitted, therefore avoiding the need for the vacuum
port. It may not be necessary the open the cartridge at all but
I'd like to see what I'm doing. The round bit in the middle is a
sort of pressure regulator/non return valve. The printer has to
suck against this to get ink. It will be sucking harder than in my
system unless the bottles are raised a bit. This is fine is unless
the plumbing leaks. I would much rather have the ink drain back
into the bottle that into the printer. This could be a total
non-issue but I haven't done any tests. The other point about this
valve thing is it means you can't refill the cart via the outlet.
It would be trivial to make a hole at the top and squirt ink in.
There is no foam block just a chamber. Just use a syringe and
blunt needle – sucking back to gauge the level.
25'th Nov,
Version 2 is working.
I had to try it. Two carts are
converted to the “easy” CIS and they are working well
so far.