Eddie's El-Cheapo CIS (Continuous
Inking System) Part-3b
November 2002
Intellidge
ink chip hack
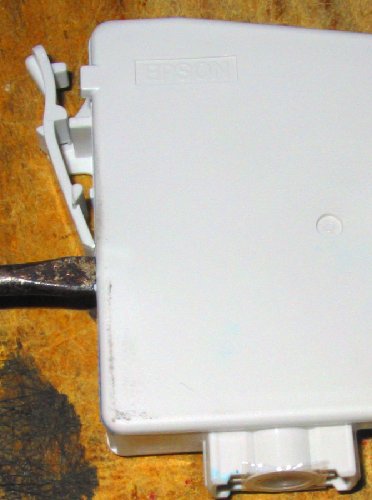
Epson 2100p version-2.
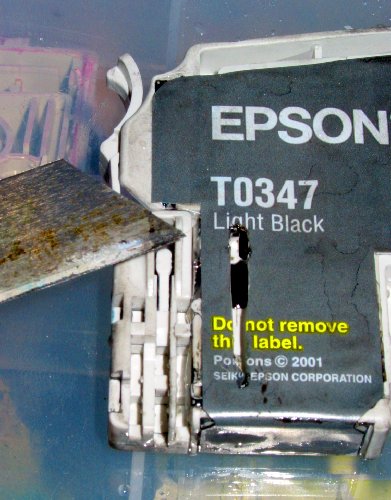
 With
a little practice the side comes of in a few minutes. I just poke
in a screwdriver and work my way around the sides. On penetration
the first thought is usually “Bugger I've torn it”
this is because the lower section is usually very inky. Don't try
this anywhere that can't be covered in ultrachrome.
With
a little practice the side comes of in a few minutes. I just poke
in a screwdriver and work my way around the sides. On penetration
the first thought is usually “Bugger I've torn it”
this is because the lower section is usually very inky. Don't try
this anywhere that can't be covered in ultrachrome.
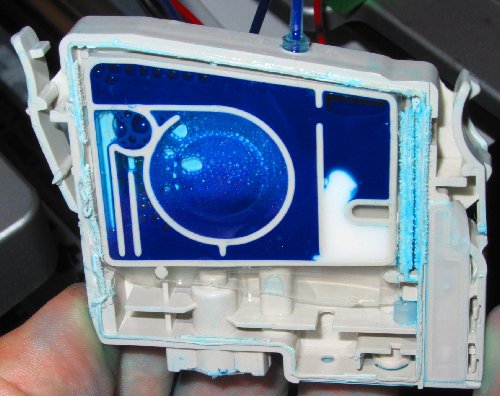
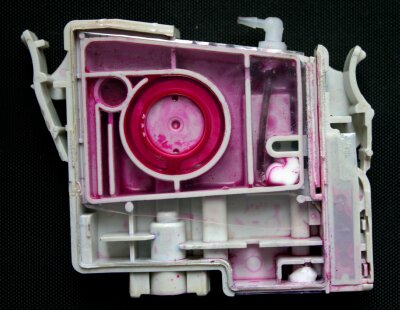
See
– messy. The ink cleans up with water. This was a brand new
cartridge and it was completely full.
Excuse
the color change. The ink is sucked out via the outlet. This has a
valve in it so you have to poke something “ink spike”
sized in to open it. I used a old nozzle off a tube of glue stuck
onto a syringe.
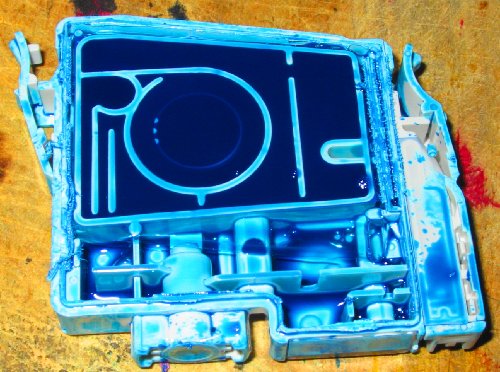
A
piece of the label is cut out to give access to the vent hole.
This is cleaned as much as practical and silicone sealant forced
in to clog the vent.
The
white mass in the lower right corner of the ink chamber is the
silicone I pumped in from the back. An ink supply tube is glued
into a hole drill though the top and the mod is complete. The last
step is to hold the cartridge upside down and suck ink into it.
This has already been done here and it is ready to plug in.
This mod takes a fraction of the time of version one. Modifying the chips on two carts and bringing the signals out is still a pain.
December
2003 - Version-2.1 and 2.2
For over a year now my CIS has been a mix of V1 and V2 type modified cartridges. Several people promised me empty 2100p/2200p carts but no-one came good with them. Recently I was given some c82 carts – these are almost identical but they only come in 3 colors (black is a bigger cart). I knew I would have to either replace or reprogram the chips for the 2100p to accept them. It should have been trivial for me to reprogram them with my homebrew resetter (see chip hack). Unfortunately the c82 chips (at least this batch) needed slower write timing and I had to spend a ½ a day sorting it out. I eventually got it to work and the chips seem ok in the 2100p. So far I have only replaced the C Y M carts and the mechanical keying is the same. When I replace the light color I will have to hack (literally) the keys. The system I had, had 3 main problems.
The tubes were too thin. My tubes were 0.6 mm I.D. This was ok for printing but too small for the ink demand during the cleaning cycles.
The join where the tubes entered the carts was weak
The resetting circuit sitting on top of the carts was a nuisance and chips with the wires attached sometimes didn't seat properly.
I bought three metres of four way ribbon tube and
used two, one metre lengths for the new ink feed lines.
I
bought proper screw-in nozzles.
Now that the printer is well
out of warranty I fitted the resetter inside the printer.
The nozzles threads are too short to go through the two layers of plastic at the top so I remove one layer. Holes were drilled and tapped with an M5 thread. I flushed out as much debris as possible.
Adam Lewera suggested plugging the air vent through the bottom
instead of cutting the label as I'd done. Functionally and effort
wise there is little difference but Adam's method is tidier and I
have used it this time. I retro-fitted the V2 carts with nozzles
and new tubes. I also replaced my C Y M with modified c82 carts.
The first batch (V2.1) lack the internal tube coming down from the
nozzle. After sleeping on it I decide feeding the ink in below the
ink level (V2.2) is a better idea because the printer does not
have to suck harder if the internal ink level is low. This only
amounts to a 20mm change in static head but this is on top of the
level changes in the bottles. If the demand valves in the carts
are working properly the supply bottle can be above the head level
but they've leaked before and I don't trust them any more.
All
in all the conversion went fairly well. My biggest problem has
been the vacuum hose inside the printer detached twice and it took
hours to find the joiner which repeatedly fell off and hide on the
bottom. Second time around I replaced the eom black tube with a
longer piece of clear silicone, re-routed it and glued it in place
– inky fingers crossed. Later I figured that the reason the
tube was detaching was because I forced cleaning fluid into the
heads while they were parked – this pressurized the inside
of the landing pad cup and also the drain tube – this caused
it to come off.
De-bunk.
 One
commercial site claims their system is better than the rest
because it has a air gap in the cartridge, a “siphon break”
which prevents ink siphoning through the head.
One
commercial site claims their system is better than the rest
because it has a air gap in the cartridge, a “siphon break”
which prevents ink siphoning through the head.
Quote
“When the printer starts to print, it is like
sucking on a tube to start a siphon. Once the siphon starts, the
ink will flow on its own, by gravity. Our filling method prevents
this.”
End Quote
This struck me as total hog-wash. Adding a “siphon break”
has the same effect as lowering the bottles which is IMHO a better
solution – or raise the printer – this is what
telephone books are made for.
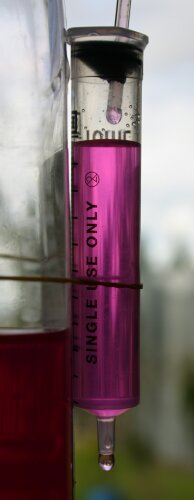
You can have a siphon with an
air gap in the line and since it only takes a few minutes to set
up to prove it – I did. It it the same as having a bubble in
the tube.
The pigmented water is siphoning from a plastic
bottle through a continuous length of plastic tube. The tube
passes through an air-tight hole into a syringe. As you can see
the break is well above the level of the supply but the nozzle is
well below it. Water is happily dripping through. If I raise the
syringe a few mm the drip stops. I wasn't expecting to need so
much level difference. I found this is true for a tube without the
syringe as well. The end of the tube had to be well below the
supply level for it to siphon. I think this is a surface tension
effect and this is doubled by having 2 drip points in the system.
Having an unbroken column of ink is better in my opinion because
the size of the air gap can increase over time forcing the printer
to suck harder to get ink.
One the other hand an air space in
the cartridge can be a good thing because it acts like a spring
and smooths out the ink demand as well as mechanical shocks
traveling through the ink. I see no reason for the carts to be
full other than is give some lea way if there is a minor air
leak,gassing or bubbles coming down the line. My system (V2.2) can
have both a continuous column of ink and air in the cartridge .
 Yet
another problem.
Yet
another problem.
Around new-year I began having prints
which were pink in the highlights. I wasn't sure if it was the ink
or the printer. I checked I hadn't mixed up the 2 magentas and
they seemed ok. I worked around it by modifying my profile
generator to let me alter the balance for the highlights.
Anyway
I can now see the problem.
The light magenta pigment is
settling out. I only noticed because there was a bubble in the
feed tube and the ink settle out at this point leaving a clear
layer on top. The extra pigment at the bottom of the bottle could
have caused the color shift. Unfortunately I have enough ink to
last a year or two. Changing inksets would be a pain but this
isn't acceptable. Presumably people who print a lot don't have
this problem.